Below are the full instructions to pull in MOW Online Booking events and to manage the inventory from those events. Online booking is used for booking appointments for family members (i.e. daughter booking events for her father) or for the client themselves. Click on a link to see more information.
1. Setup Online Booking account
1.
2.Click the plus button 3.Enter the following information: a.Email b.Name c.Password d.Profile you want to create events for 4.Click the save button |
2.Optional - Update email message for Online Booking
1.
2.
3.Change the return email address to an email address within your organization. 4.Change the subject to your invitation email. 5.Change the body of the email. a.
|
2.Click the plus button 3.Enter the menu name or select the menu from the drop down 4.Set the Start Date 5.Optional - Set the End Date 6.Click the Save button |
2.
3.Open the TR or FRZ module 4.Find the OB Access field 5.Set the OB Access Field to "Yes" |
1.
2.Click the envelope button beside the person you would like to invite 3.An invitation email will be sent (Example below). |
6.Client creates FRZ event
a.Note: Instructions for creating events are on your Online Booking site.
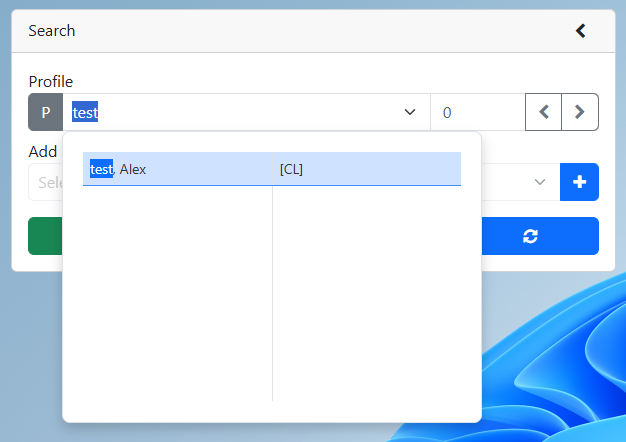
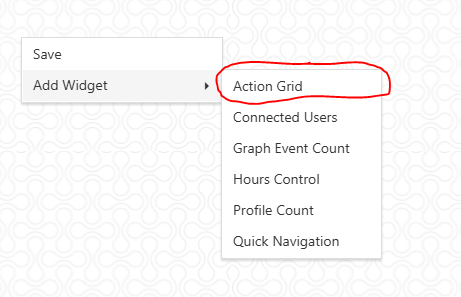
7.Pull in event using the Action Grid
2.
3.Click the blue calendar beside the event you would like to accept. 4.
5.Save, Cancel, or Delete the event. a.Changes you make will reflect on the client side.
|


8.Optional - Verify event in Event Editor
2.Set the date range to a date range that will include the event 3.Optional - Set the Profile Name or the Profile Number to narrow down the search 4.Optional - Set the Module to narrow down the search 5.Optional - Change the options to include Posted or Canceled events 6.Click the Search button 7. Verify that the Online Booking Event is present. |
2.Change the end date to include FRZ events that have inventory items attached. 3.Refresh the Make Sheet table 4.The Make Sheet will add any new inventory items |
2.If you want to see all Inventory items (including items that do not need to be made during the set time period) make sure the Show All Checkbox is selected 3.If you only want to see Inventory items that need to be made make sure the Show All Checkbox is deselected 4.Click the refresh button to refresh the Make Sheet table |
11. Optional - Adjust Make Sheet
2.Click on the ADJ cell for the inventory item you would like to adjust. 3.Type the adjustment into the cell 4.Click the save button 5.The Make column is adjusted |
12. Print Make Sheet
2.Optional - Set the start and end dates 3.
4.Refresh the Make Sheet table 5.Click the Print button |
13. Update in stock using the make button
2.Click the M button beside the inventory item 3.The value from the Make column is now moved to the In Stock column |
1.
2.Set the report date 3.Select routes 4. 5. 6.Click the print button |
15. Print Pick list
1.
2.Set the report date 3.Select routes 4. 5.Select the Pick List 6.Click the print button |
2.Set the date range to include the events you are completing 3.
4.Click the Complete check box 5.Click the save button |
17. Optional - View completed event in Event Editor
2.Set the date range to a date range that will include the event 3.Optional - Set the Profile Name or the Profile Number to narrow down the search 4.Optional - Set the Module to narrow down the search 5.Optional - Change the options to include Posted or Canceled events 6.Click the Search button 7. View the Completed Event
|